Pages

Wednesday, October 05, 2011

Manhole Covers


Remember my manhole covers?  Turns out they are off of the shipwreck William Dickenson, a tug boat that was built in 1893 in Benton Harbor, Michigan by E. W. Heath for the Independant Towing Company for use in Chicago.  In 1895, the tug boat helped in the search for the victoms of the Chicora.  In a newspaper dated 1904 from "The Eau Claire Leader" of Eau Claire, Wisconsin had an article saying: "A large touring automobile, with four shreiking occupants - three men and a woman - shot through the open draw of the Rush street bridge at 11 pm and plunged into the Chicago River, turning a sumersault as it fell." The crew of the William Dickenson along with Sailor Lewis Mohr rescued the four passengers. This story made National News.  We found newspaper articles covering this story from "The Waterloo Times - Tribune" of Waterloo, Iowa, "The Bismark Daily Tribune" of Bismark, North Dakota, and "The Daily Huronite" of South Dakota.

In 1923 the tug boat caught on fire in Marine City, Michigan.  The "Port Huron Times" reports: 'According to the crew, the fire is believed to have originated in the coal bunkers, late Saturday night.  Fought by the crew the fire was soon under control but broke out again more severely in places difficult to reach.  The vessel was cut loose from its moorings and allowed to drift out into chanel where it partially sank.  When the fire became so dangerous that it might spread to other vessels docked at the shipyard it was necessary to cut the burning tug from its moorings and allow it to drift away from its doc and nearby vessels.'

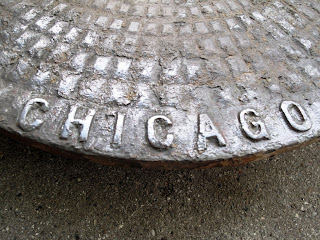
Today there isn't much left of the William Dickenson and there is even less now that 2 of her manhole covers have taken residence in my garage.  Ray cleaned them up a bit and upon closer examination they are pretty cool.  Some of the raised letters are backwards: the "D"s in Foundry and Indiana, and the "3"s .  The covers were manufactured in Chicago by the R M Eddy Foundry!  It has a simple pattern that radiats out from the center of the cover.  There is even an indentation where the ring used to be to lift the covers up.  Based on the amount of corrosion present, we don't think that they are entirely made of steel.  My guess is that it is made of gray iron, a common material used in Foundries. 


So how does one recover not one but two manhold covers that weigh about 50lbs a piece while being weighted down with dive equipment? Well, you would use C-clamps of course! You get yourself about 3 or 4 C-clamps, suit up, dive under the water where the visiblility is about 10 inches in front of your face, and start feeling for some round things that might or might not be your manhole covers. Then after you have felt around for a good half hour through the mud and underwater grass, you feel something that might be promising. Clamp on the c-clamp in several locations, tie your rope through the clamps, attach a lift bag and let the air lift up the manhole covers and pray to God Almighty that everything goes according to plan, because if it doesn't you are right back at square one with your 50lb manhole cover at the bottom of the St Clair River. Luckily for Ray, everything went according to plan, the second time around! 

Monday, October 03, 2011

The Clara Dressy

How cute is this?  I just can't get over it!  Totally adorable.  Too bad the pattern only comes in 2 sizes. Looks like I'll have to resize it if  I want it for my girls.  Goodness gracious what a fast knit this turned out to be!  The pattern is knit from the bottom up and starts out with seed stitch, which has great definition in cotton.  Then it transitions into the pattern followed by some plain knitting.  Once you get to the middle, you decrease half of your stitches and revisit your seed stitch for 10 rows before knitting the leaf patterned yolk.  Because this is knit in the round, when you cast off the garment is complete.  No sewing!  I love this feature! 

I did make one modification to the pattern and that was to add 2 inches in length to the dress section.  The pattern called for the length to be 9.5 inches for the size I was making and I felt that was a bit short.


One Christmas item complete, 4 to go. 

Friday, September 30, 2011

Clara Dressy Kit

My kit for the Clara dressy arrived!  It includes the pattern and 2 skeins of Isager 2 yarn, a 50/50 blend of alpaca and wool with about 250 meters of yarn.  I chose the dusty lavender color and have no intention of using this lovely yarn for the dressy. 


I do however intend to use Elann.com's Callista because it is mommy friendly.  AKA Machine Washable.  This is huge for moms everywhere.  I remember once when Karolyn was a baby, about 6 months old, I made her a sweater out of non-machine washable alpaca.  I went about my daily routine of working 8 hours, coming home, preparing and cleaning up dinner, washing and changing the baby and starting the daily load of laundry.  The next day when removing the laundry from the drier, I discovered that I had machine washed and dried the hand knit baby alpaca sweater.  I thought that baby clothes were tiny to begin with until I saw my shrunken hand knit baby alpaca sweater.  I about cried.  It was at that moment that I vowed to make all baby items out of wonderful machine washable yarn.  I'm not about to go back on my vow, machine washable Callista it is!


Monday, September 26, 2011

Christmas Knitting

It has occurred that we are currently in what I refer to as Prime Christmas Knitting Season.  As with all knitters, I too have people from all over placing orders of what it is that they want me to knit for them.  And every year someone gets disappointed as I just can't knit for everyone.  This year I have decided to limit the knitting for the kids only.  I have my 2 angels (Karolyn and Sydney), my sisters 3 angels (Alana, Bryce, and Jacqueline) and my brother's angel (Trenton) which comes to a grand total of 6 kids to knit for. 

I've decided to knit baby Jacqueline the Clara Dress by Karin Vestergaard Mathiesen.


Isn't this dressy just adorable? The pattern is only available in a kit and the yarn that comes with it is an alpaca/ wool blend.  I'm gonna swap out the yarn for a machine washable cotton blend that will not be destroyed when her mom does the laundry.  The kit is en-route as we speak!

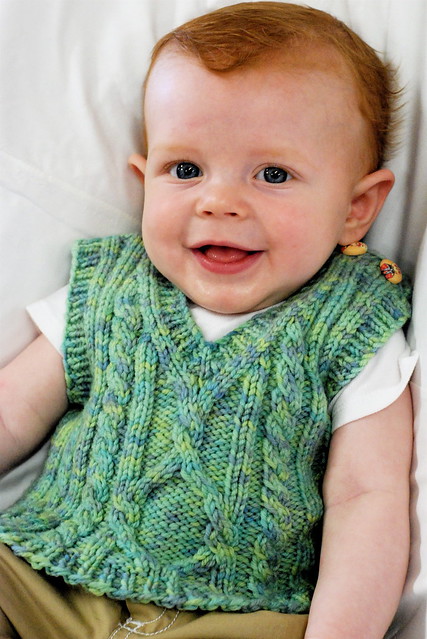
For the boys, Trenton and Bryce, I've decided The Pembroke Vest is in order. 


It comes in several sizes and I'm gonna make 2 of size 4T out of some Debbie Bliss's Cashmerino Aran yarn I have left over from a previous sweater I made for myself.  This stuff is quite dreamy indeed.  I'm only hoping that the mom's don't destroy the adorable vest during the washing process. 

For the girls, I've decided to design them a cardi.  I'm still not sure if I want to add a hood or not but there is still time for that decision.  What I have in mind is a very simple yolk style fair isle cardigan.  It would be knit in the round and steeked,  I love steeking!  My cardi would feature a ribbed cabled band along the front edge with a sparkly zipper.  Us girls just love our bling!

This is the current plan and may or may not change as time progresses.  I am determined to have hand knits for all of the kids for Christmas!! Wish me luck!


Monday, September 12, 2011

Swifty


I find it incredibly ironic that we live in an age that prides itself on being "green" and "environmentally friendly" yet we toss away a significant amout of trash that eventually fills our landfills.  We toss out diapers, and paper towels, and kleenex, and chlorox wipes, and baby wipes, and swiffer pads.  All of these items were not disposible 50 years ago.  Back then people washed and reused these items.  Now in the "green" age, we toss it.  Ironic isn't it?  I've decided to take a stand and stop being wasteful and I'm starting with the swiffer!

I made a "swifty" with the nameless cotton I used to make my star dishcloths.  So now my dishcloths match my swifty, how cute is that?  First I wet Swifty, added some floor cleaner and attached it to the swiffer.  I cleaned my entire kitchen floor in the same amout of time it takes to use a regular store bought disposible swiffer pad however with the Swifty, my floor was cleaner!  It got off all of the stuck on grime that is usually left behind.  I'm quite impressed with my environmentally friendly swifty. 

The pattern can be found in the second Mason-Dixon book Knitting Outside the Lines


Friday, September 09, 2011

Bleeding Hearts Stole

I've been working on the Bleeding Hearts Stole.  Actually I've not been working on it and then picked it up again from hibernation.  I'm making it out of mohair which poses its own set of problems.  First and formost is that due to the fuzzy nature of the fiber, its a nightmare to rip out.  Secondly, if you happen to lose some stitches its a nightmare to reclaim them. 

Such was the case recently.  Here I am knitting happily along, minding my own business, when I hear a noise.  No it wasn't the kids trying to kill each other or the sound of cars driving by or the birds chirping or any other such pleasant sound.  It was the distinct sound of a screw working on unscrewing itself.  Now you may be asking, how in God's name does she know what sound a screw makes when it is coming undone?  I know because its happened before particularily when I've had hundreds of stitches on the needles and these hundreds of stitches needed to be picked up again.  And due to the fact that I'm working on a lace project with mohair, I would like to avoid this exact situation. 

I carefully inspect my needle joints and I find the culpret with about 20 stitches its about to take down with it.  Dirty bastard. 


Do you see all those stitches bunched up on the needle? That is exactly where my needle is coming loose from the cord.  My task is extract the stitches from the loosened section, tighten it back up again, give it a good talking to and get back to enjoying my evening.  If all goes well, it will happen just like that.  This may sound simple enough but I forgot to mention I have to do all this while the kids are entertaining themselves by climbing all over me.  Do they not know that I'm working with mohair? 


There there, everything is going to be just fine.  I've got a nice glass of wine and the kids havn't spilled it yet.  Life is good.  I started on the task at hand and about a half an hour later the procedure was complete.  No more stitches bunched up where they did not belong and the needles were properly joined.  I did give the needles a good stern lecture which included words like: respect, responsibility and mohair. 


It was getting late and I decided to call it a night.  The kids didn't kill each other, the dog didn't run away, and my stitches are right where they are supposed to be.  I'd say all is well with the world!


Wednesday, September 07, 2011

Manhole Covers


"Honey, I got them!"

"Got what?" I ask.

"You know, the manhole covers! Both of them!"

Oh dear God, he actually did it. "That's wonderful dear."  He's been talking about recovering them for weeks now but I didn't actually think he would do it.

"I know exactly where I'm gonna put them!"

Dare I ask? "Where?" I ask, not quite certain I should have.  All sorts of god awful places of display run through my head for these rusted out hunks of junk to come to mind. 

"In the front yard! I'm gonna paint them gold and make gold coins out of them and proudly display them in the front yard!"

"Of course dear, because every self respecting Michigander needs 90 year old gold painted manhole covers on display in the front yard."  Just what I've always dreamed of, manhole covers in the front yard.  Shoot me now.

A little while later my husband comes home with the said manhole covers.  He explains to me that these manhole covers have been recovered from a 90 year old shipwreck located in the St. Clair River.  To think, these covers have not seen the light of day in 90 years and they are going to reside in my front yard as gold coins.  Is that considered an insult to the manhole covers?  I certainly hope not. 

He then tells me that he changed his mind and decided to turn them into a gold sun dial that will be located in the back yard, which, as he explains sounds much cooler than gold coins.  All I heard is that they will be located in the back yard and after that I just didn't care!  

Monday, September 05, 2011

Star Dishcloth


The car was all loaded up, everyone was buckled in and waiting on me.  I needed something and FAST.  So I grabbed the needle case, a plastic bag containing 3 leftover balls of nameless cotton and made mad dash for the car before I was left behind.  I had no idea what I was going to knit but it would be a bonus if it was simple enough to memorize, small enough to be finished in about an hr and one that can make use of the nameless cotton. 

What does one do with 3 nameless balls of cotton with no idea as to how much yardage is present? Then it hit me, a dishcloth!  How much yardage does one really need for a dishcloth?  If I find myself falling short on yarn, I can always cast off.  Its a dishcloth afterall and doesn't need to be any specific length or size for that matter.  A dishcloth is definately what these 3 nameless balls of cotton are destined to become.  But what type of dishcloth?  After all,  I didn't even know I was going to be making a dishcloth before I made the mad dash for the car.  Thank God for smart phones and Ravelry!  I reasearched dishcloth patterns and of course a million patterns popped up.  However there was one in particular that I was drawn to, a star shaped dishcloth.   The pattern met all of my criteria and I'm totally hooked onto the dishcloth craze!  The best part is actually getting to use them.


Star Dishcloth Pattern

Cast on 15 stitches.
This cloth is made up of 6 wedges, all exactly the same. Then the edge is sewn together, the threads are sewn in and the cloth is complete. :)

Every wedge:
Row 1 and all odd rows: K across to last 3 stitches, P3.
Row 2: K3, YO, K to last st, turn.
Row 4: K3, YO, K to last 2 sts, turn.
Row 6: K3, YO, K to last 3 sts, turn.
Row 8: K3, YO, K to last 4 sts, turn.
Row 10: K3, YO, K to last 5 sts, turn.
Row 12: K3, YO, K to last 6 sts, turn.
Row 14: K3, YO, K to last 7 sts, turn.
Row 16: K3, YO, K to last 8 sts, turn.
Row 18: K3, YO, K to last 9 sts, turn.
Row 20: K3, YO, K to last 10 sts, turn.
Row 22: K3, YO, K to last 11 sts, turn.
Row 24: K3, YO, K to last 12 sts, turn.
Row 26: Cast off 12 sts, K to end of row.
Now, look at how EASY that wedge is! You won’t even have to print the pattern out!!! :)

The pattern can also be found here.

Monday, April 04, 2011

Blanket Square #7: Seed Pearl Block Stitch


My oldest daughter comes up to me this week and tells me that she is almost 7. Of course I agree with her. Then she looks up at me and announces that "7 is half a teenager". LOL I didn't know how to respond to that one. I'm most certainly not ready to be a mom of a teenager and when did she get to be almost 7? She is still my baby that needs hugs and kisses and squeezes (a really tight hug). She is the reason for many a sleepless night and trips to the doctor. She is the one who is silly and goofy even if she is bit ackward but still manages to light up a room the second she enters. Without her my life would be so very different. Good Gravy time certainly flies when you arn't looking.

Blanket Square is the Seed Pearl Block Stitch and while it is incredibly simple to knit, it is also quite handsome. As I was knitting it, I thought it would make a very attractive baby blanket. Granted certain baby thoughts are coming easily to me after I've been informed I'm mother to half a teen-ager.

Enjoy!


Seed-Pearl Block Stitch

A Second Treasury of Kniting Pattern by Barbara Walker p. 8

Multiple of 8 sts plus 1

Row 1: (Wrong Side) and all other wrong -side rows - Purl.
Row 2: P1, *K1, p1; rep from *.
Rows 4, 8 and 12- Knit
Rows 6 and 10 - P1, *k7, p1; rep from *.

Monday, March 28, 2011

Blanket Square #6: Ripple Stripe Pattern


The weather here in Michigan has been such a flirt. Last week we had the mercury upwards of 55-60F and this week we had snow. SNOW! Granted it did all melt but its officially Spring and we are still getting snow. I was informed by Sydney that Spring is coming because the birdies are coming back and that means spring. How did that child get so smart?

This weeks square is the Ripple Stripe Pattern and according to Barbara it is excellent for an easy knit. She also says it is excellent for sweaters, skirts and dresses.


Ripple Stripe Pattern

From "A Second Treasury of Knitting Patterns" by Barbara Walker

Multiple of 8 sts plus 1

Row 1: (RS) K4, *p1, k7; rep from *, end p1, k4
Row 2: P3, *k3, p5; rep from *, end k3, p3
Row 3: K2, *p2, k1, p2, k3; rep from *, end last repeat k2
Row 4: P1, *k2, p3, k2, p1; rep from *
Row 5: K1, *p1, k5, p1, k1; rep from *
Row 6: purl

Repeat rows 1-6

Monday, March 21, 2011

Raglan Cardi


Signs of spring are all around us here in Michigan. The birds are chirping, the snow is all but gone, and the weather is upwards of 50 degrees F most days. With this said, we are working our way into what I refer to as Spring Sweater Weather. Spring Sweater Weather is when we wear our sweaters that are still made of wool but perhaps it has some cotton blended with it and its full of pastels and lighter colors as opposed to the warm and complex colors of the Fall Season.


I've been working with Elann.com's Peru Soft quite a bit lately and just love this yarn. I'm a bit disappointed that it is currently discontinued but grateful for the 100+ balls I have stashed away. The yarn is quite soft and makes for a fast knit because of its bulkyness (is this a word?) but more importantly its machine washable. With 2 very active little girls this is a desirable quality in a yarn.


I decided Sydney needed a Spring Sweater and chose to knit up a quick and simple raglan cutaway. This is a personal pattern and while I did not take notes of any kind, its just a variation of a generic raglan cardigan that is knit from the top down.

Generic Raglan Cardi

Start out by casting on one or two stitches for the front right, place a marker, one or three stitches for the right sleeve, place a marker, enough stitches for about 5 - 6 inches (for a child) for the back, place a marker, one or three stitches for the left sleeve, place a marker, and then one or two stitches for the left front. Knit one row even and purl back. On the next right side row, increase one stitch before and after each stitch marker, a total of 8 stitches will be increased in this row. Purl back. Continue to increase 8 stitches every right side row until the armhole measures about 5 - 6 inches (for a child). At this point, place the sleeve stitches on some waste yarn (we will come back to them later) and knit only the right and left fronts along with the back. Knit until the garment reaches the desired length and bind off.

Return the sleeve stitches to your needles, join in the round and place a marker to indicate the end of each round. Feel free to use whatever method you find easiest for knitting in the round on sleeve stitches. I find that using 2 circular needles works best for me. Knit 3 rounds even and on the next round decrease 1 stitch at the beginning and end of the round (a total of 2 stitches will be decreased this round). Decrease 2 stitches every 4th round until the sleeve is about 4 inches around (approximately the width of the arm). Knit even to desired length and bind off the sleeve stitches loosely. You can easily add a 2x2 rib or a simple lace pattern for style at the end of the sleeve if you so choose. Repeat for the other sleeve.

At this point, I picked up stitches all around the garment and did a simple knit 2 purl 2 rib for about 2 - 3 inches and then loosely bound off all my stitches.

PS. See that pillow that Sydney is cuddling with? Its Betsy's and it matches the blanket we made her!

Monday, March 14, 2011

Blanket Square #5: Square Lattice


Don't let this pattern fool you because it certainly fooled me. It is harder than it looks because I kept loosing my place in the pattern. I would strongly recommend marking your place. Overall, this was quite fun and I love the resulting square.


Square Lattice
Multiple of 14 sts plus 2

Row 1: Knit
Rows 2, 4 and 6: P2, *(k1, p1) twice, k1 p2; rep from *
Rows 3, 5 and 7: K3, *p1, k1, p1, k4; rep from *, end last repeat k3.
Row 8: P2, *k12, p2; rep from *
Row 9: K2, *p12, k2; rep from *
Row 10: Purl
Rows 11, 13, and 15: K2, *(p1, k1) twice, p1, k2; rep from *
Rows 12, 14, and 16: P3, *k1, p1, k1, p4; rep from *, end last repeat p3.
Row 17: P7, *k2, p12; rep from *, end k2, p7
Row 18: K7, *p2, K12; rep from*, end p2, k7

Repeat Rows 1 - 18

Monday, March 07, 2011

Blanket Square #4: Moss Diamond and Lozenge Pattern


This pattern looks harder than it actually is. It is a rather ingenious arrangement of Moss Stitch "diamonds" - which arn't true diamonds, as they are off-center by one stitch - with lozenges of knit and purl.

Moss Diamond and Lozenge Pattern
A Second Treasury of Knitting Patterns, pg 17

Multiple of 12 sts.

Rows 1 and 2: *K6, p6; rep from *
Rows 3 and 4: * P1, k5, p5, k1; rep from *
Rows 5 and 6: *K1, p1, k4, p4, k1, p1; rep from *
Rows 7 and 8: *P1, k1, p1, k3, p3, k1, p1, k1; rep from *
Rows 9 and 10: *(k1, p1) twice, k2, p2, (k1, p1) twice; rep from *
Rows 11 and 12: *P1, k1; rep from *
Rows 13 and 14: *K1, P1; rep from *
Rows 15 and 16: *(P1, k1) twice, p2, k2, (p1, k1) twice; rep from *
Rows 17 and 18: *K1, p1, k1, p3, k3, p1, k1, p1; rep from *
Rows 19 and 20: *P1, k1, p4, k4, p1, k1; rep from *
Rows 21 and 22: *K1, p5, k5, p1; rep from *
Rows 23 and 24: *P6, k6; rep from *
Rows 25 and 26: *P5, k1, p1, k5; rep from *
Rows 27 and 28: *P4, (k1, p1) twice, k4; rep from *
Rows 29 and 30: *P3, (k1, p1) 3 times, k3; rep from *
Rows 31 and 32: *P2, (k1, p1) 4 times, k2; rep from *
Rows 33 and 34: *P1, k1; rep from *
Rows 35 and 36: *K1, p1; rep from *
Rows 37 and 38: *K2, (p1, k1) 4 times, p2; rep from *
Rows 39 and 40: *K3, (p1, k1) 3 times, p3; rep from *
Rows 41 and 42: *K4, (p1, k1) twice, p4; rep from *
Rows 43 and 44: *K5, p1, k1, p5; rep from *

Repeat rows 1-44.

Monday, February 28, 2011

Druid Mittens


What a fun knit! I can honestly say that this pattern held my attention for the entire duration of the project. Its been awhile since that has happened. The pattern is chalk full of twists and turns and bobbles and the palm section has texture gone wild. Yes, the pattern is predictible however there are 3 different sections on the front of the mitten and each section is doing a different thing than the others. If you are looking for a challenging knit, this is it.

The entire pattern is charted and split up between 3 separate charts, something I consisider to be a bonus. The first chart is a simple knit and purl combinations that no where near prepares the knitter of what is to follow.

The second chart is segmented off by the front and the palm of the mitten. And while one can clearly see that the pattern repeats and is somewhat predictable, don't let this fool you. This is not some sittin'-by-the-TV kind of knitting. This is you-must-really-pay-attention kind if knitting. I found this out while watching my "Desperate Housewives" and realized that I crossed my braid the wrong way. Luckily I was able to fix one of the mis-crosses but was unable to fix the second mistake. (I keep trying to convince myself that all will be OK.) Once I reached the end of the second chart, I just assumed that we were to do a 3-needle bind off. So, I turned my knitting inside out and proceeded to do just that, when a little voice said "Libby, this is a Jarod pattern and we all know about Jarod patterns. Will you please just read what the next part says?" And luckily I read the pattern because a 3-needle bind-off is NOT what was to be done next. Next, I was instructed to short row across 5 sts decreasing on either end every other row. THEN came the 3-needle bind off.

Chart number 3 is saved for the thumb, whose stitches were placed on some waste yarn in chart 2. Again as with chart 2, one must really pay attention because the front part of the thumb is cabled while the back part is the same texture stitch as the palm.

The yarn I chose to use was Woolmeise 100% Merino Superwash. When I first touched it I fell in love. Right there at my kitchen table me and the yarn had a moment. Tingly sensation and all. The depth of color was...well words can not describe it. And the twist. Lets talk about that for a second. I've never knit with a yarn that had the twist that this yarn has. I was advised to ball it twice to help with the twisting during knitting.

I couldn't be more happy with my pairing of yarn and pattern. It provided the challenge I was looking for with exceptional results!

Monday, February 21, 2011

Blanket Square #3


This texture pattern I borrowed from another pattern, Druid Mittens by Jarod Food. It requires minimal attention and is definately a sitting-in-front-of-your-favorite-tv-show kind of knitting.

Jarod's Texture Pattern

Multiple of 2 sts.

Row 1: *K1, with yarn in front slip 1 stitch, Repeat from * across.
Row 2: Purl
Row 3: *With yarn in front slip 1 stitch, k1, Repeat from * across.
Row 4: Purl

Wednesday, February 02, 2011

Blanket Square #2

For the second square I decided to keep it simple and go with the seed stitch. I absolutely love the seed stitch. The texture is amazing, its very easy to do, and the results are to die for!


Seed Stitch

Multiple of 2 sts.

Row 1: *K1, p1. Repeat from * across.
Row 2: *P1, k1. Repeat from * across.

Blanket Square # 1

Determining what type of square to knit was alot harder than I thought it would be. The possibilities are endless afterall. There are cables, or texture, or lace, or cables with lace, slip-stitch patterns. Like I said, the possibilities are endless. So to keep my sanity I decided to limit it to texture squares.

Here I am, curled up on my couch going through the "Second Treasury of Knitting Patterns" by Barbara Walker, trying to decide on a texture stitch pattern. The book contains over 700 patterns so I'm bound to find something. Right? I flip on over to the "texture" section and again find an overwhelmingly amount of patterns. Left leaning texture, right leaning texture, texture with zigzags, texture with ribs. What part of this is going to help keep my sanity? Damnit woman, just pick a pattern and be done with it!


For the first square I chose the "Seeded Rib Pattern" located on page 7.

Seeded Rib Pattern

Multiple of 4 sts plus 3.

Row 1: K3, *p1, k3; rep from *
Row 2: K1, *p1, k3; rep from * end p1, k1

Libby's Blanket

So I was thinking that it sure has been awhile since I’ve made myself a big blanket and wouldn’t it be great if I got my bum in geer and made myself one?

To help stay on track, I came up with a timeline for what needed to be made and by when.

Jan: make 3 squares
Feb: make 3 squares
March: make 2 squares
April: make 3 squares
May: make 2 border strips
June: make 3 squares
July: make 2 squares
August: make 3 squares
Sept: make 3 squares
Oct: make 3 squares
Nov: make 2 border strips
Dec: Sew it all together

When its all said and done, I'll have made 25 12"x12" squares and 4 5' border strips. And when its all sewn up, it will be my blanket!

Now for the yarn. I've decided to go with Elann.com Peru Soft (now a discontinued yarn) because I have a crazy amount of it. Yes, Ann had a bag sale at an amazing price and lets just say that I have several bags. The other thing that is absolutely great about this yarn is that its a bulky wt, translating to very fast knit!

So if all goes accordingly to plan, I will have a blanket by the end of the year!

Monday, January 31, 2011

Jacqueline Rose

Awhile back I just HAD to make Jarod Flood's Hemlock Ring Blanket. Have you ever had that? Come across a pattern that was just itching to be knit? Well this was it for me. I had absolutely no idea what I was gonna do with it or what yarn I was gonna use. Not that I have a shortage of yarn. Trust me on this. Jarod's is knit in a wool but after stash diving, I was not willing to bust up some wool lots for this blanket that I had no idea what was to become of it. Eventually I decided upon some cotton. A chunky pink cotton that had been hibernating for some time and needed to see some action!


In no time at all 6 balls of yarn magically became a blanket. A rather small blanket at that. To say the least, I was feeling rather gyped. Definately not feeling the Jarod love at all. I mean, his pictures imply a blanket that one can snuggle under during a cold day. Yea, so maybe I didn't exactly use his yarn or make his gauge...(alright point taken) but still. Just sayin'. What in the hell am I gonna do with a rather large pink cotton doily?

Then my sister made the announcement that only a person with a rather large pink cotton doily wants to hear.

"I'm pregnant"

God almighty, let it be a girl, please let it be a girl....

"It's a girl"

One could have heard the sigh of relief from Tenbucktoo. At that moment, I knew exactly what was to become of my oversized baby pink cotton doily. It was destined to be Jacqueline Roses' blankie.

Thursday, January 27, 2011

Betsy's Blanket

Back in October of 2010 I got a phone call that stopped me dead in my tracks. My good online friend Betsy had a massive stroke. How could this happen? She is in her 50's and much too young for this kind of trauma. I was stunned and wanted to help but I'm in Michigan and she is in Texas. There isn't much I'm gonna do up here but pray. And pray I did. Its embarrassing the amount of candles lit before the IOP (Infant of Prague) with novenas and litanies and short prayers for Betsy.

Then the knitter in me kicked into gear. I sent out feelers via Ravelry if anyone wanted to put together a blanket for our friend. The response was overwhelming and I found a way we could help from afar.


I chose a yarn I knew that Betsy would love in colors that were meaningful to her. Furthermore I instructed each knitter to knit a 12" x 12" square and get it to me by the specified date. This would give me time to sew it all together so Betsy would have it just in time for her rehabilitation and recovery time. Sounds easy enough in theory. But you know what they say about best laid plans!


When the squares started rolling in I was so incredibly excited. And then they kept coming and coming and coming. 25 in all plus the border edges. To put it mildly, I was getting overwhelmed. What did I sign up for? Sure, I've done blankets like this before but right before Christmas? OK, buck up Libby Grant, you can do this.


I decided to tackle this little by little and sew up the squares 30 minutes at a time. Picture this. I have all of the squares laid out on the basement floor. Me on my belly lying on top of the blanket sewing away with 2 kids thinking we are gonna play horsey. Yep the kids were climbing all over me while I was sewing away. So I was only able to get a couple of 5 foot lengths sewn together at any one given time. And there were 8 of them to do for the inside squares and another 4 to do for the borders.


Eventually they were all sewn together and then came the border strips. At this point I was getting excited and could actually visualize the finished project! Then came the final touches when I mitered the corners and wove in all the edges.


Then I just looked at it in amazement because 29 women got together to make a blanket for our friend. It truly is a work of art.